|
Okay, so let’s get started with ThingLink – I had a play with it, and like last time, took a look at the important bits: functionality, legal/ Safety/ ethical considerations, and class-room applications.
ThingLink allows you to upload an image, then click anywhere on the image to create tags by entering text or graphics. To add tags you can embed video, audio, images, social sites, E-commerce sites and other utility sites. For a comprehensive list, see the screenshot below of the “How-to” presentation on their site (Fig .1). You can embed your ThinkLink Artefacts into websites, and to embed my ThingLink image onto my Weebly website, I found an instructional PDF here that was particularly useful. . 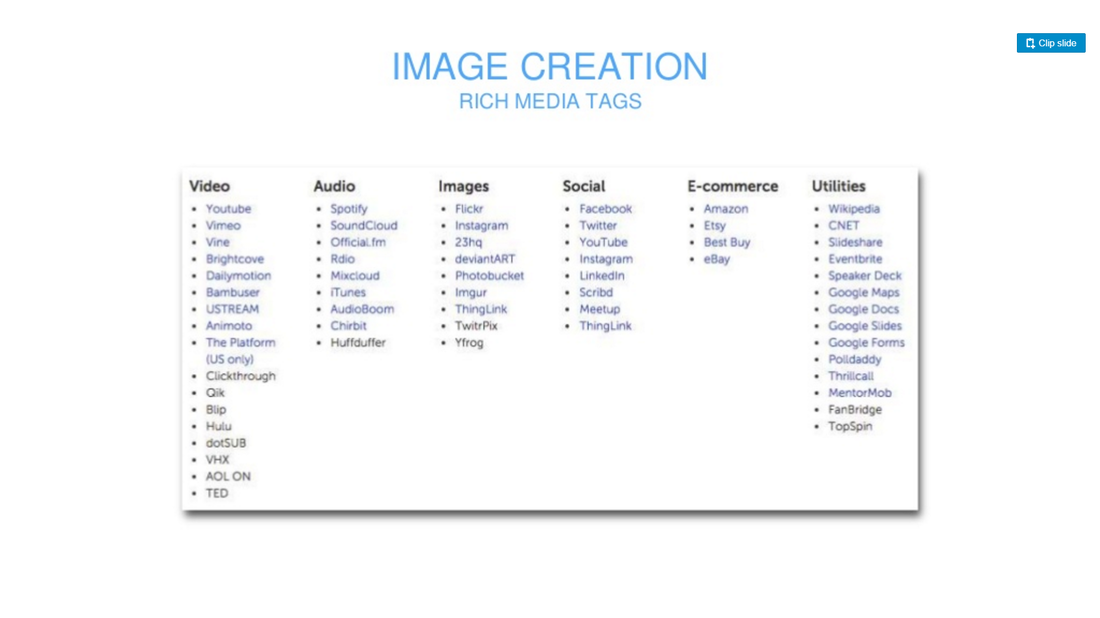
, Fig.2,Fig 1: Media Tags. Image Source: www.ThingLink.com
There were a lot of settings I was not able to access, as I was on a free profile, but I could see the wide possibilities! Even with what was available for free, you could make something informative and fun. You could include others too as multi-author capacity is a part of this tool. I was able to go to the settings tab and choose an option for secondary authors to edit the image, and also turn this option off at will The settings are also the spot where you can check out what controls you as a teacher can put in place when considering legalities, ethics and safety. ThingLink allows teachers to control image-access. In settings teachers can choose the type of images their students would access, by going to ‘display images’ and selecting, ‘safe’. Safe images are those created by teachers and students or specifically vetted by ThinkLink staff. Once again, like with a blog, copy-right is an issue, and we would need to ensure that students are aware of what are the sources of their digital artefacts. We need to ensure students learn how to credit sources, and seek permission for the use of digital artefacts that are copy-righted. We can also show students how to access free sources such as Creative Commons for images etc. If they use their own photos, then permissions are required from fellow students and their parents. At a basic level, the skills required uploading an image, research skills, linking sites and pictures. Using it in a more sophisticated manner would probably require further skills of photo editing, and digital image creation, which is not something I got into at this point. I stuck to uploading an image I found on creative commons. One of the cool things about ThingLink is that its functionalities make it a diverse tool. Not only is it a great tool for students to create their own presentations, but also a wonderful way for teachers to present class content so that students can feel ownership over their exploration. From a perspective of SAMR, ThingLink allows those who are presenting information to substitute normal methods such as whiteboards and lecturing and allows students using it to directly substitute physical tools in the creation of images. It augments teaching because it is more interactive. Student presentations are augmented because students have greater access to digital enhancement tools to edit their images, and can explore other drawing and painting programs too when creating original digital images to upload to ThingLink. Drawing and painting programs provide a vast array of colours, and much better erasing than non-digital tools! ThingLink modifies and redefines how students and teachers can present information. A person presenting can accommodate for different learning styles by posting information in tags in different ways - in the form of images, videos, audio, or interactive sites. The audience can feel ownership over the process of learning from the presentation, as they can explore the tags at their own pace, and click on what interests them the most. The presenters can also invite others to contribute their own tags. The image can be shared across the world and can invite comments and tags from across the globe. I loved learning things by looking at ThingLink images. My motivation to keep reading and explore was more than when using a normal text-book, website, or slideshow, even when the artefacts created were very simple. Here are some links to simple presentations which I still found informative and engaging: A Viking Tool box for the avid archaeologist and some funky muscles for the blooming biologist. I thought of an idea for a history class, in which students could be given a task as follows: Students are given an, or create an image which portrays a group of people at a certain time/ location in history. They are asked to research that time in history and find out facts like what occupations people had, what significant events happened, common names etc. Students then need to label each individual in the picture with tags that show information. Through creating "stories: and a "character" for each individual or object in the image students creatively share historically appropriate information, and allows the viewer to learn about how people lived in that time period. Click here J or see below Fig, 2, to check out an example I created – it’s rife with historical inaccuracies, but really it was just a chance for me to play around! The YerUNKLE Family, 1875.
Fig. 2: Example of potential student-task.
HAVE FUN!!
0 Comments
Leave a Reply. |
ArchivesCategories |
 RSS Feed
